iOS5からreleaseやautoreleaseが不要なのか

Objective-C Automatic Reference が ”YES” になっているので、”NO” に変更
iOS5からreleaseやautoreleaseが不要なのか
Objective-C Automatic Reference が ”YES” になっているので、”NO” に変更
[php]
-(void)viewDidAppear:(BOOL)animated{
srand((unsigned int)time(NULL));
int dice = rand() % 6 + 1;
if(dice == 1){
[self showString:@"OK牧場!!"];
}
}
[/php]
[php]
-(void)viewDidAppear:(BOOL)animated{
srand((unsigned int)time(NULL));
int dice = rand() % 6 + 1;
if(dice == 1 || dice == 6){
[self showString:@"OK牧場!!"];
}
}
[/php]
[php]
-(void)viewDidAppear:(BOOL)animated{
srand((unsigned int)time(NULL));
int dice1 = rand() % 6 + 1;
int dice2 = rand() % 6 + 1;
if(dice1 == 1 && dice2 == 1){
[self showString:@"OK牧場!!"];
}
}
[/php]
[php]
-(void)viewDidAppear:(BOOL)animated{
srand((unsigned int)time(NULL));
int dice1 = rand() % 6 + 1;
int dice2 = rand() % 6 + 1;
if(dice1 == 1 && dice2 == 1 || dice1 == 6 && dice2 == 6){
[self showString:@"OK牧場!!"];
}
}
[/php]
[php]
-(void)viewDidAppear:(BOOL)animated{
srand((unsigned int)time(NULL));
int dice1 = rand() % 6 + 1;
int dice2 = rand() % 6 + 1;
if((dice1 == 1 || dice1 == 6) && dice2 == 6){
[self showString:@"OK牧場!!"];
}
}
[/php]
[php]
-(void)viewDidAppear:(BOOL)animated{
srand((unsigned int)time(NULL));
int dice1 = rand() % 6 + 1;
int dice2 = rand() % 6 + 1;
if(dice1 == 1){
[self showString:@"OK牧場!!"];
} else {
[self showString:@"NOだぜ"];
}
}
[/php]
HelloWorldLayer.mに追加[int]
[php]
// nextFrame:」が定期的(※)に呼び出されます。
[self schedule:@selector(nextFrame:)];
[/php]
HelloWorldLayer.mに追加[intの下]
[php]
//nextFrameのアクション
– (void)nextFrame:(ccTime)dt {
//「seeker1.position.x + 200 * dt」でseekerスプライトの座標を右に
//dtには前のフレームからの経過時間.移動したい量を掛け合わせることで1秒間かけて移動する量を指定(1秒で200px)
kyara01.position = ccp(kyara01.position.x + 200 * dt, kyara01.position.y);
//ウィンドウサイズより右に行ったら左に戻す処理
if (kyara01.position.x > [[CCDirector sharedDirector] winSize].width + 32) {
kyara01.position = ccp(-32, kyara01.position.y);
}
}
[/php]
スプライト(CCSprite)とは、ゲーム内のオブジェクト キャラクターなど。
HelloWorldLayer.m に追加
[php]
//スプライトを格納するインスタンス変数を定義
@interface HelloWorldLayer () {
CCSprite *kyara01;
CCSprite *cocosGuy;
}
@end
[/php]
HelloWorldLayer.m の 「init」内に追加
[php]
kyara01 = [CCSprite spriteWithFile:@"01.png"]; //01.png を読み込み済のpngをスプライトにあてる
kyara01.position = ccp(50, 100);
[self addChild:kyara01];
cocosGuy = [CCSprite spriteWithFile:@"Icon.png"];
cocosGuy.position = ccp(500, 200);
[self addChild:cocosGuy];
[/php]
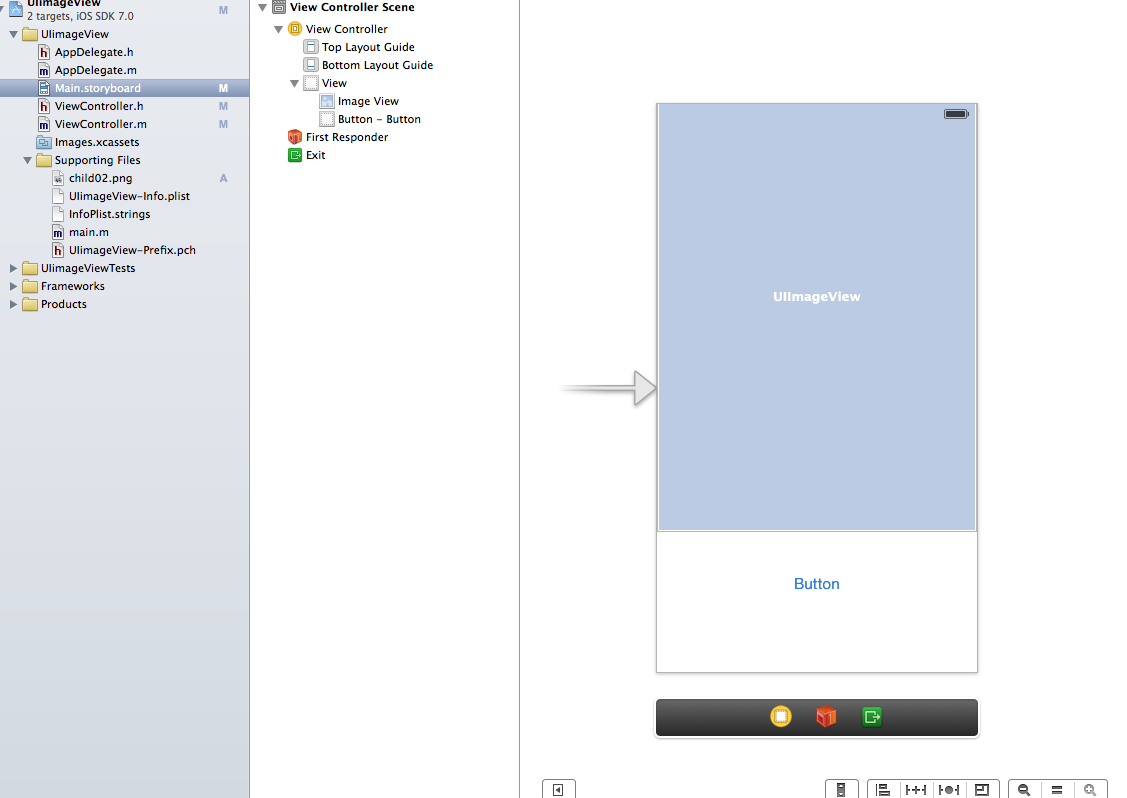
Main.storyboardに 「image View」と「botton」を配置
ViewController.hにコネクト
[php]
#import <UIKit/UIKit.h>
@interface ViewController : UIViewController
@property (weak, nonatomic) IBOutlet UIImageView *myImageView;
– (IBAction)topBtn:(id)sender;
@end
[/php]
ViewController.mにボタンアクションを設定
[php]
– (IBAction)topBtn:(id)sender {
_myImageView.image = [UIImage imageNamed:@"child02.png"];
}
[/php]
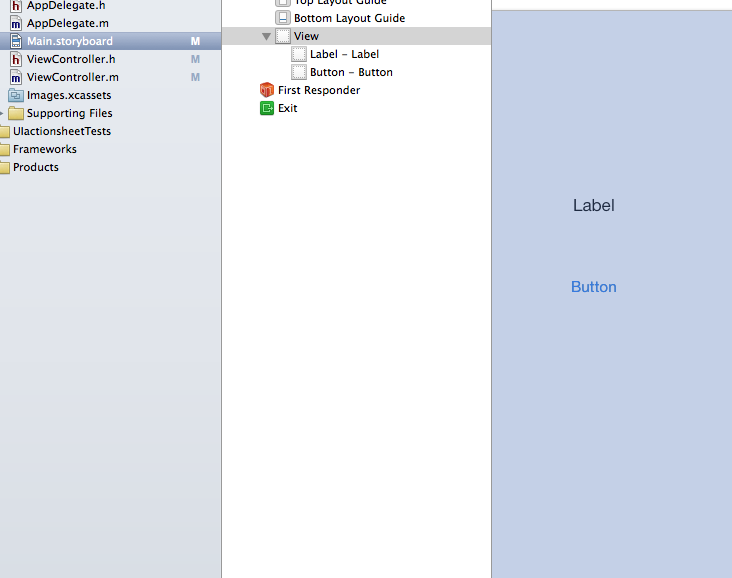
Main.storyboudにボタンをラベルを配置
ViewController.hにボタン/ラベルを入れる
[php]
#import <UIKit/UIKit.h>
@interface ViewController : UIViewController <UIActionSheetDelegate>{
}
@property (strong, nonatomic) IBOutlet UILabel *mylabel;
– (IBAction)btn:(id)sender;
@end
[/php]
ViewController.mにボタンを配置とアクションを追加
[php]
– (IBAction)btn:(id)sender {
UIActionSheet *actionSheet =
[[UIActionSheet alloc] initWithTitle:@"テストタイトル"
delegate:self
cancelButtonTitle:@"キャンセル"
destructiveButtonTitle:@"タイトル"
otherButtonTitles:@"処理1",@"処理2", nil];
[actionSheet showInView:self.view]; //呼び出し
}
– (void)actionSheet:(UIActionSheet *)actionSheet
clickedButtonAtIndex:(NSInteger)buttonIndex{
_mylabel.text =
[NSString stringWithFormat:@"ボタン",buttonIndex];
}
@end
[/php]
init(インスタンス作成時に呼び出したイニシャライザ)
↓
viewDidLoad
・View が初めて呼び出される時に1回だけ呼ばれます。
・アプリ起動後に初めて当Viewが表示された場合に1度だけ呼ばれます。
↓
viewWillAppear
・View が表示される直前に呼ばれるメソッド
・タブ等の切り替え等により、画面に表示されるたびに呼び出されます。
・タブが切り替わるたびに何度でも呼ばれます。
↓
viewDidAppear
・View の表示が完了後に呼び出されるメッソド
・タブ等の切り替え等により、画面に表示されるたびに呼び出されます。
・タブが切り替わるたびに何度でも呼ばれます。
↓
viewWillDisappear
・View が他のView (画面から消える) 直前に呼び出されるメッソド
・View が他のView (画面から消える) 直前に呼び出されるメッソド
・タブが切り替わるたびに何度でも呼ばれます。
↓
viewDidDisappear
・View が他のView (画面から消えた) 非表示後に呼び出されるメッソド
・View が他のView (画面から消える) 直前に呼び出されるメッソド
・タブが切り替わるたびに何度でも呼ばれます。
cocos2d-iphoneをダウンロード
https://code.google.com/p/cocos2d-iphone/downloads/list
cocos2d-iphone-2.1.tar.gzが最新のようなので、ダウンロードします。
「ターミナル」を起動して、以下のコマンドを入力
①Downloadsにファイルが入っているのでDownloadsに移動
[php]
$ cd ~/Downloads
[/php]
②解凍します。
[php]
$ tar xzvf cocos2d-iphone-2.1.tar.gz
[/php]
③解凍後で出来たディレクリへ移動
[php]
$ cd cocos2d-iphone
[/php]
④cocos2d-iphoneディレクリの中のファイルinstall-templates.shを実行
[php]
$ ./install-templates.sh
[/php]
Xcodeを起動し、テンプレートが出来ていればインストール完了
①「ViewController.h」に
[php]
//————————————————-//
//フレームワークをインポート
//————————————————-//
#import <UIKit/UIKit.h>
//————————————————-//
//クラスとインスタンス変数の宣言
//————————————————-//
@interface ViewController : UIViewController <UIAlertViewDelegate,UIActionSheetDelegate>
//————————————————-//
//アクセサメソッドの宣言を
//————————————————-//
//————————————————-//
//オリジナルメソッドの宣言
//————————————————-//
– (void)configureView;
– (void)alertOKCancel;
– (void)actionOKCancel;
//————————————————-//
//ヘッダーファイル
//————————————————-//
@end
[/php]
②ViewController.m
[php]
/————————————————-//
//ヘッダーファイルをインポート
//————————————————-//
#import "ViewController.h"
@interface ViewController ()
@end
//————————————————-//
//クラスとアクセサメソッドの実装
//————————————————-//
@implementation ViewController
//————————————————-//
// 処理
//————————————————-//
– (void)viewDidLoad
{
[super viewDidLoad];
// Do any additional setup after loading the view, typically from a nib.
// ビューの設定をまとめて行うメソッドを呼び出します。
[self configureView];
}
//————————————————-//
// ビュー[.hのオリジナルメソッド]
//————————————————-//
– (void)configureView
{
UIButton *customButton1 = [UIButton buttonWithType:UIButtonTypeRoundedRect];
customButton1.frame = CGRectMake(40.0, 100.0, 240.0, 40.0);
[customButton1 setTitle:@"アラート" forState:UIControlStateNormal];
[customButton1 addTarget:self action:@selector(alertOKCancel) forControlEvents:UIControlEventTouchUpInside];
[self.view addSubview:customButton1];
UIButton *customButton2 = [UIButton buttonWithType:UIButtonTypeRoundedRect];
customButton2.frame = CGRectMake(40.0, 180.0, 240.0, 40.0);
[customButton2 setTitle:@"アクションシート" forState:UIControlStateNormal];
[customButton2 addTarget:self action:@selector(actionOKCancel) forControlEvents:UIControlEventTouchUpInside];
[self.view addSubview:customButton2];
}
//————————————————-//
// [.hのオリジナルメソッド]
//————————————————-//
– (void)alertOKCancel
{
UIAlertView *alert = [[UIAlertView alloc] initWithTitle:@"アラート"
message:@"よろしいですか?"
delegate:self
cancelButtonTitle:@"いいえ"
otherButtonTitles:@"はい", nil];
[alert show];
}
– (void)actionOKCancel
{
UIActionSheet *actionSheet = [[UIActionSheet alloc] initWithTitle:@"アクションシート"
delegate:self
cancelButtonTitle:@"いいえ"
destructiveButtonTitle:@"はい"
otherButtonTitles:nil];
actionSheet.actionSheetStyle = UIActionSheetStyleDefault;
[actionSheet showInView:self.view];
}
//————————————————-//
// デリゲートメソッド
//————————————————-//
– (void)viewDidUnload
{
[super viewDidUnload];
// Release any retained subviews of the main view.
}
– (BOOL)shouldAutorotateToInterfaceOrientation:(UIInterfaceOrientation)interfaceOrientation
{
return (interfaceOrientation != UIInterfaceOrientationPortraitUpsideDown);
}
– (void)alertView:(UIAlertView *)alertView clickedButtonAtIndex:(NSInteger)buttonIndex {
NSLog(@"『%d番』のボタンが押されました!",buttonIndex);
}
– (void)actionSheet:(UIActionSheet *)actionSheet clickedButtonAtIndex:(NSInteger)buttonIndex {
NSLog(@"『%d番』のボタンが押されました!",buttonIndex);
}
//————————————————-//
// メソッドファイルend
//————————————————-//
@end
[/php]